Angry Murloc Build Light
If you have ever played World of Warcraft you know what a Murloc sounds like. You’re running along on some quest and you hear RWLRWLRWLRWLRWL!! and then you know you’ve got a Murloc to fight. Then because of their overlapping patrol patterns you hear it a bunch more times, and pretty soon you’re on a ghost run. I picked up the J!NX talking plush Murloc when I bought a Battle.net authenticator, waste of money to pay shipping to Australia on just one item.

Why a build light? When you work in a team on a software project sooner or later someone will break the build when they commit code to the shared repository. It’s no big deal as long as you catch it quickly and fix it. If the break goes unnoticed you get Confusion and Delay as you back out change after change and everyone wonders who is to blame and hopes it wasn’t them.
The solution is continuous integration. One popular solution is Jenkins (formerly known as Hudson), an Open Source tool that among other things can trigger a build when a commit is detected. The result of the build has to be made known to the team right away. If the build machine is local you can play a sound but the sound could be missed.
Lots of things can be used to make a visual indicator including pre-made lights intended for industrial control, a big screen showing results from Bamboo or similar or maybe Brian the Build Bunny. All of these things have their advantages and disadvantages but they all have visual indication of a problem and a way of communicating with the build server.
(DO NOT put your giant build status plasma right in some unfortunate developer’s field of view. Do you really want someone distracted by a continually flickering, updating display? This seems like obvious advice but it happened to me.)
I really like the Nabaztag but they are hard to buy now, so last year I built a simple build light using an Atmel 8-bit microcontroller to drive three very bright LEDs (from Sparkfun) in RGB arrangement, hidden in a diffusing dome. I used Dean Camera’s LUFA library to make USB communications trivially easy. I wrote a small Mac OS X program to send state commands via USB and I had a neat build light that could be made to display any colour. It worked well because the build machine was a centrally located Mac mini and a directly connected USB light was right where it needed to be.
This year I’m in a new job on a project that more programmers will soon join. The machine that I can use for our git and build server is also a Mac mini, but it is not in the same room as the developers. USB is therefore not a good solution this time! I need ethernet, or maybe wireless.
After a bit of thought I decided to make it easy on myself and use Arduino. I bought the Sparkfun Inventor’s Kit for Arduino and the Ethernet shield. I downloaded the Arduino Software, asked our network administrator for an unused IP address, grabbed some sample code and within an hour I had a web server. Right away I was able to use curl to send requests to the board and display the GET string – too easy!
Ten minutes later I was controlling the RGB LED. How disappointing, what was going to be a fun project was nearly over!
To keep the fun going I decided to improve it a bit. The LED needs to do something while building so developers and others can see that something is happening.
Also so that anyone interested can see that their code was received, it did kick off a build as expected, and it might be worth looking at the light again soon to see how the build went. Also to make it obvious that lots of code is being checked in and the iOS team really is incredibly productive.
I tried a naive approach to RGB colour cycling first, incrementing an 8-bit value for R, then G when it ticked over and B when G ticked over, treating it like one big 3-digit base-256 value. It worked but not in a particularly pleasing way. What looks better is to use colours from the HSV colour space, sweeping the hue value right around the circle and converting the hue to RGB values for use with Arduino’s analogWrite(). With a small delay() on each angle change, done!
One outcome of a build is failure, and that’s the fun part. Steady red, I discovered last year, is not enough to grab attention. I wanted the light to pulse so that it isn’t incredibly annoying but doesn’t go unnoticed. That was fairly easy with a state variable to decide whether to increase or decrease intensity on every pass through the loop and to toggle direction when the maximum or minimum values are reached.
At this point I noticed that while varying the H part of HSV changed colour very effectively, S and V appeared to do nothing much. The values passed to the RGB setting function were fine, but always full intensity. I took a shortcut and just added a brightness multiplier applied after the colour is decided – it’s not a very big sin because colour accuracy is not critical and it does exactly what I want. With this brightness multiplier varying over time the light pulses nicely.
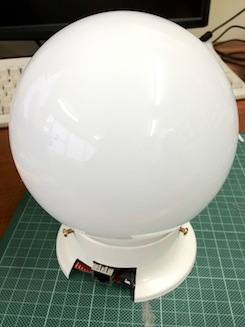
Physically the light is a very cheap light fitting from Bunning’s, an Australian hardware chain. Having the base and dome made it really easy. For the old build light I built a wooden base and used Liquid Nails to attach the glass dome from a discarded light fitting, way too much work. This base gives plenty more space to work in, a platform to attach hardware both sides using spacers and bolts, and plenty of space above the LEDs for a thin layer of tissue to help diffuse the light.
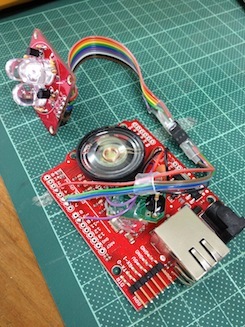
Experienced Arduino users will notice that’s not a Uno + Ethernet Shield used in construction. I used one of Sparkfun’s Ethernet Pro models, essentially a Uno + Ethernet Shield in one. This held up construction a little because I was not aware of the requirement for a FTDI USB-serial cable and had to wait for it to arrive.
The finishing touch is sound. The plush Murloc is a good match for the size of the light fitting I picked out to house the build light. And if he sits over the glass dome it’s like he’s guarding an egg… I didn’t want to have any cable between the light and the Murloc though as it would make the whole assembly fragile, so I took the Murloc’s voice box out and built it into the base.
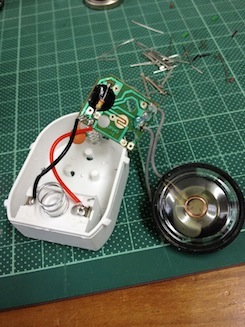
The voice box should be familiar to anyone who has disassembled any talking toys, there’s a speaker, a black-blob integrated circuit on a tiny PCB, batteries and a simple button. I first took the batteries and case away and powered the Murloc sound board from the Arduino board. The button is a rubber dome bridging PCB contacts – I traced the PCB track back to the blob, noticed the other half of the contact was ground and decided to try simply pulling the pin down to logic zero. Success!
Now when the build breaks, “Rwlrwlrwlrwl!” And a minute later, “Rwlrwlrwlrwl!!” – until the build is fixed. The other outcome is that everything is fine. For that I picked a nice muted green, no pulsing, just a steady colour that won’t bother anyone. And it matches the Murloc.
If someone issues a command that isn’t recognised the light goes purple.
How’s it working? All tests show it’s fully functional. In use we’ll see whether the Murloc is too annoying, I have a feeling I should make the Murloc noise only every ten minutes or so.
In the background you can see my command window issuing curl commands to the light’s IP address. It responds to GET requests for Building, BuildGood and BuildBroken. If I need more states in future they will be easy to add, as Arduino just isn’t difficult enough to seem like an embedded system at all. Try it!